Designing the Jack Shaft
Next part of the process, we’re going to design the jackshaft. So you may or may not know what a jackshaft is. It is very commonly used. So it is a mechanical device. It is used as an intermediate shaft. It transmits power from the motor to the rear wheel. And here are several benefits.
Function and Alignment
So you can see in this diagram, here is the chain that comes from the motor. This is the jack shaft. So there is a sprocket that will drive the motor. And on the other side is a sprocket that will drive the wheel. So a few things that will help align the chain with the drive sprocket. It also allows the rear wheel to pivot without loosening or tightening the chain as the suspension cycles.
Gear Ratio Adjustment
It also allows you to change your gear ratio. So for example, these two sprockets in this picture are the same, but you can change the size of the sprockets here, and then you can change the overall gear ratio.
Example Frame Design
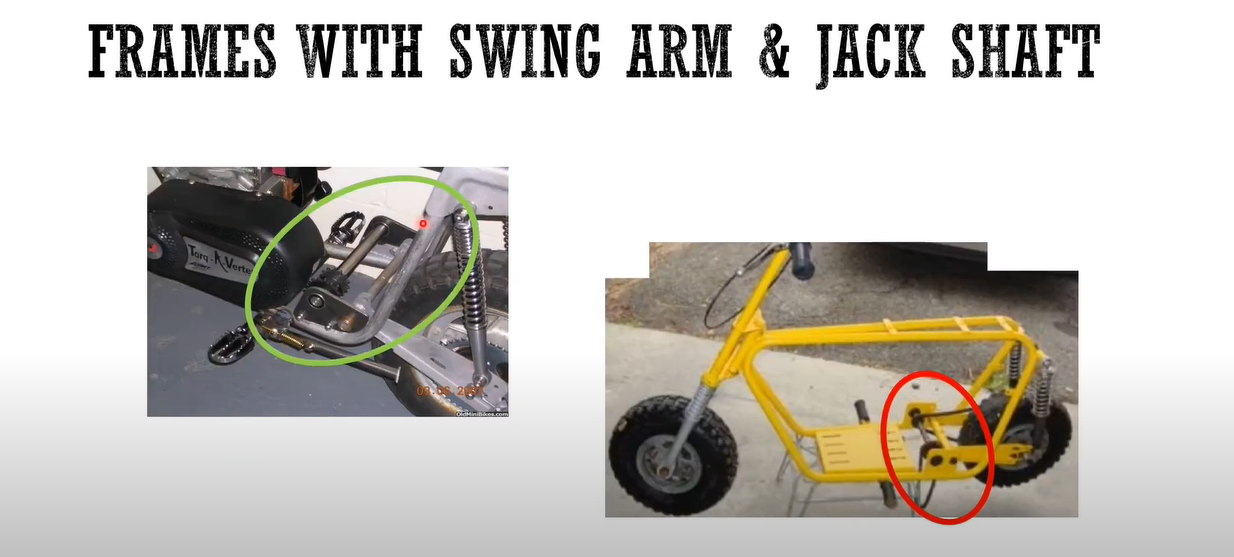
Here is an example of a simple frame. It is a small bike with a small gas engine. System here now here they are going to drive the sprocket is on the same side as the motor drive side. We’re going to switch sides, but here’s your jackshaft. So it has bearings that it rides on. This shaft has a key and the sprockets are the key. So when one sprocket turns another turn your chain will drive in this case, the chain is going to drive that sprocket and then that sprocket is going to drive the rear wheel.
Suspension and Chain Tension
And that’s mainly for alignment issues here, but also for suspension travel. You need to, you want to get that pivot as close to the swingarm pivot as you can. Otherwise, as the suspension moves, for example, as the swing arm moves up, the chain will loosen and fall off. And if the swing arm goes down like that, the chain will get too tight to break.
Power Transmission
OK, so this shaft transmits power. Then there is the second shaft for this design. And the swing arm is mounted on this shaft and is mounted on the bushings. And so the swingarm here can pivot up and down along the drive system, and the closer you get those two centers, the better you’re going to be at maintaining tension on your chain.
Side View and Design Details
There is a side view. This is a very simple design. I love this kind of design. So here you can see this is the jack shaft. Now, in this case, the motor drive is on the opposite side. The wheel drive is on this side. So we’re going to switch the power from the left side of the shaft to the right side by going through the jack shaft. And on each side of this plate is a bearing with a shaft inside. Now it’s a bolt that there’s a shaft that’s mounted on that bolt, and that’s where the swingarm pivot goes. This is the other side. You can see the drive chain coming from the motor. The jack is a bearing for the shaft, and a pivot point for your swing arm.
Alternate Design Example
Same image as before without all the arrows on it. And here is another design that is very similar. It doesn’t have a motor on it, so maybe you can see a little bit more in this case, again, the motor is going to drive the sprocket, which is going to drive the sprocket, which is going to drive the rear wheel. And you can see that there are two different sized sprockets to affect the gear ratio. This is an interesting unit. This is for any type of motorcycle that has an original, jackshaft built into the swing arm. So this is a similar concept which is one of your options in terms of designing this jackshaft.
Two Different Types of Jack Shafts
So I’m going to show you two different types that I’ve identified. There are other ways to do it. I think these are probably good and easy methods.
Two-Shaft Method
This is a method we have seen before. It has two shafts. So this shaft swing arm is going to pivot on that shaft. It is mounted on bushes. So you can only use bronze bushings as you are not looking at 360 degree rotation or high revolutions. So this will allow the suspension to move up and down easily on the shaft right there. And then here’s my jack shaft with two sprockets on it and that shaft is mounted on a bearing. And we will need to design this unit. In this case, I have a dummy piece of tubing in there because I wanted to make sure my swing arm didn’t interfere with the side plate.
Identifying the Two-Shaft Unit
So this type you can identify because it has two shafts as part of the unit. Here is the jackshaft unit without the swing arm attached. So your swing arm, that’s the pivot tube. Your legs are going to connect there for the swing arm. And here it is exploded so you can see all the pieces. So it’s really that simple. You can buy some bearings that are commercially available, and they’re just little bushings that you can buy or design, and that’s all the parts you need for that.
Single-Shaft Method
There is another type that I have seen, and this type uses a shaft. So there’s an inner shaft, keyways cut on it, and these sprockets will be attached to that shaft. So then, the motor will drive it, it’ll drive the inner shaft, turn that sprocket.
Operation of the Single-Shaft Method
Now our driven sprocket is on the other side of the wheel, so then the chain will go there and drive the wheel. The chain will wrap over the swing arm and then down. Here now inside this tube, and this is part of the swing arm, are some needle bearings and this will allow, as the shaft rotates, this will also allow the swing arm to move up and down. That’s what it really works on. The shaft that’s rotating is mounted on bearings and then this pivot tube, I call it, is mounted on the swing arm inside it, it has needle bearings that allow it to rotate on the shaft. So there’s a lot of action going on with this shaft.
Compact Design
Here is the unit without all the other stuff. So you can see that it is relatively compact. Here is the explosive scene. There is an internal keyed shaft. There are needle bearings that fit inside here. So there is one on each side. There are a couple of brass bushings to hold the steel on the steel. Where there is a bearing and then I set collars on the end that you lock onto the shaft and that will prevent the whole unit from coming apart. There is really no axial load, but just vibration or so, this will prevent the bearings from falling out.
Bearing Types
And just to review, this is what the needle effect looks like. So the shaft will fit inside that and then it’ll fit inside the other, like in our case, it’ll fit inside the tube and it’s very compact and it’s good for the load and speed that we have. Is. Is
Additional Components
And a flange is a ball bearing. There are very few ball bearings, but it is sealed and has a flange. So it won’t come out when you press it into the side plates. And a flange is a bronze bushing, which you can buy or make, and just a bronze spacer. It’s like a washer that you can use on that shaft. Again, you don’t want steel on steel rubbing. So that bronze is going to stop that. This will allow easy movement between points.
Process for Designing a Jack Shaft
So process-wise, and that’s how I did it. First, clearly decide what type of jackshaft you want to use. You might want to do a little research on this. And then look at the overall width of your swing arm.
Maintaining Width for Jack Shaft Assembly
So you have an assembly with the swing arm and the rear wheel and everything on it. Look how wide it is. We want to try to keep this width for the jackshaft assembly as this is approximately how wide your frame is going to be. It is really important that you are able to align the sprockets. So the sprocket on the jackshaft that’s going to drive the sprocket on your wheel needs to be able to align there. So what I did was to add a work plane to the assembly. So I knew exactly where the face of that sprocket was. I made sure it would line up and this may require you to modify your swing arm a bit, but it shouldn’t be critical.
Creating a New Assembly
So then I created a new assembly. So I entered that swingarm subassembly model. So just the swing arm tube model. And then I made my models, they were designed to be modeled, and then I inserted them into the model and then I designed them and until everything fit together. Designed them. And that meant I had to go back and revise my models until I got all the parts to fit together. So I just wanted to show you again what I’m talking about. So I made a work plane on the face of this sprocket. So now I know that when I build my jackshaft assembly, the sprocket that goes in there has to line up.
Modifying Tube Width
So what I found was that I had to modify the tubes that were too wide, so I had to reduce the width of the tube. It wasn’t, it’s not a big deal, just go to the section, change its length, and update your section. So keep that in mind because, you know, the whole point of this is that we’re going to be able to drive it so that the sprocket has to line up. Just a few notes.
Fitting the Jack Shaft Unit on the Frame
Note that the jack-shift unit has to be fitted to the frame. The next thing we’re going to do is design the frame, so it’s very likely that we’ll have to make some modifications to the jack plane. At least we’ll have the basic design down. Let’s see, you’ll obviously have to revise parts as we go. This is only part of the process.
Bearing and Sprocket Considerations
And any time you’re putting in place if you’re going to accommodate a bearing or something, make sure it’s commercially available. So look at the manufacturer’s catalog, find the IDOD width of the bearing and then build it into your design. In fact, if they are available, you can grab these models and put them into your assemblies. That’s totally fine. Likewise with the sprockets. Make sure the sprocket you are going to use or something that is actually available.
Revising Side Plates
The other side plates. These are just some of the ballpark things we have to do once we get our frame. So it is highly likely that we will have to revise these side plates to better fit our frame. It’s again, it’s just going to be part of the process here.


